One of the least glamorous but most critical aspects of RV and van life travel is maintaining your toilet system. Whether you’re boondocking deep in national forests or parked at developed campgrounds, a malfunctioning toilet can quickly turn an amazing adventure into an uncomfortable situation. Understanding how to perform simple maintenance tasks like replacing a toilet seal not only saves you money on service calls but also gives you confidence to handle emergencies on the road. This DIY approach is especially valuable when boondocking in remote locations where professional help isn’t readily available.
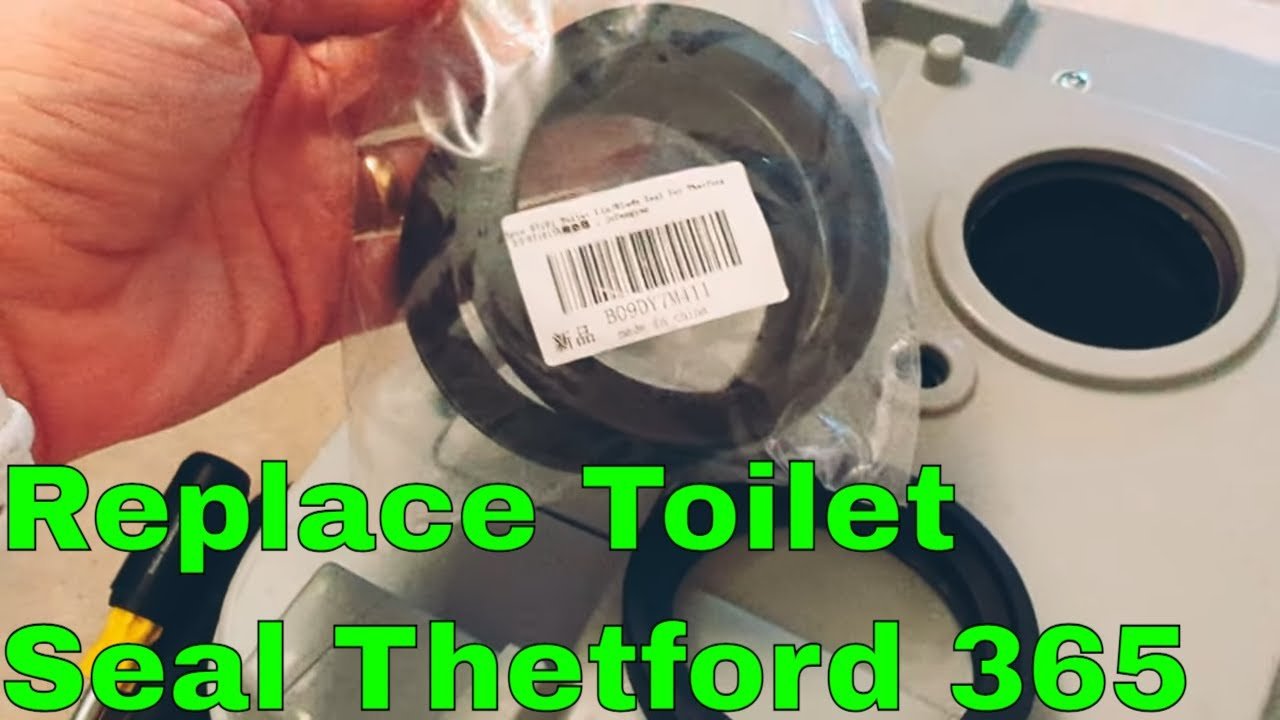
Portable toilets like the popular Thetford Porta Potti series are workhorses in the RV community, providing reliable sanitation in compact spaces. These units are designed for years of service, but like any mechanical component with moving parts and rubber seals, they eventually require attention. The rubber seal between the waste bowl and holding tank is particularly susceptible to wear over time, developing ripples and losing the smooth surface needed for a watertight seal. When this happens, you might notice water draining from the bowl into the tank when it shouldn’t, or worse, unpleasant odors escaping when the unit is closed. Understanding these water system components helps you maintain your entire RV plumbing effectively.
Recognizing When Your Seal Needs Replacement
The telltale sign of a failing toilet seal is water slowly leaking from the bowl into the lower holding tank, even when you haven’t used the flush mechanism. This typically happens gradually, so you might notice the bowl empties over several hours or overnight. On closer inspection, you’ll likely see the rubber seal has developed waves, ripples, or cracks along its surface—compromising the smooth edge required to maintain pressure against the bowl. This wear occurs naturally over years of use, with the rubber breaking down from exposure to waste chemicals, cleaning products, and regular opening and closing of the toilet blade.
Beyond the obvious water leakage, a failing seal can lead to more serious problems if left unaddressed. The constant moisture transfer between bowl and tank creates an ideal environment for bacterial growth and unpleasant odors. Additionally, if the seal is compromised, you may experience difficulties when pumping out the holding tank, as pressure can escape through gaps rather than forcing waste out through the drain valve. Addressing seal problems early prevents these compounding issues and ensures your RV toilet system continues functioning reliably. This preventive maintenance is particularly important when campervan boondocking in areas without easy access to repair facilities.
The Simple Solution: Replacing Your Toilet Seal
Fortunately, replacing a toilet seal is one of the most straightforward DIY maintenance tasks you can tackle on your RV or campervan. The entire process typically takes less than 30 minutes and requires only basic tools—a flathead screwdriver for prying out the old seal, and perhaps some dish soap for lubricating the new one. Replacement seals are inexpensive, and buying a multipack means you’ll have spares for future maintenance cycles. Most repairs can be completed with basic RV tool kits that every van owner should keep on hand.

The replacement process begins by completely removing the old seal from its groove around the toilet blade mechanism. With most models, you can simply grasp the rubber edge and pull firmly—though if it’s particularly stubborn, a flathead screwdriver helps lever it out without damaging the surrounding plastic. Take note of how the original seal sits in the groove, as you’ll need to install the new one in the same orientation. Once the old seal is out, clean the groove thoroughly with mild soap and water to remove any residue, waste particles, or degraded rubber that might prevent the new seal from seating properly. Using RV-safe cleaning supplies ensures you don’t damage plastic components.
Installation Techniques for a Leak-Free Seal
Installing the new seal is where attention to detail makes all the difference between a successful repair and one that still leaks. A pro tip that seasoned RV owners swear by is lubricating the edges of the new rubber seal with a mixture of dish soap and water before installation. This simple trick reduces friction dramatically, allowing the seal to slide into its groove without bunching or folding. Apply the soapy water around the outer edges of the seal, avoiding the center portion that will contact the bowl, then carefully position the seal into the groove starting at one point and working your way around.
As you press the seal into place, ensure it sits evenly in the groove without any twists, folds, or gaps. The rubber should feel snug but not overly stretched—if you’re having to force it, double-check that you have the correct seal size for your specific toilet model. Once fully seated, wipe away any excess soap residue with a clean cloth. The final and most satisfying step is testing your work: pour a small amount of water into the bowl and observe whether it remains there without draining into the lower tank. If the water holds steady, you’ve successfully completed the repair! For future reference, keep a maintenance log book to track repairs and replacement dates.
Preventive Maintenance for Extended Seal Life
While toilet seal replacement is relatively simple, extending the life of your current seal through proper maintenance saves you time and money. The single most important habit is developing a regular cleaning routine using only RV-safe toilet chemicals that won’t degrade rubber components. Harsh household cleaners, bleach, and abrasive scrubbers can break down seal materials prematurely, so stick with products specifically formulated for RV waste systems. Additionally, when cleaning around the seal mechanism, use soft cloths or sponges rather than abrasive pads that can scratch or nick the rubber surface. Stock up on RV-safe toilet paper to prevent clogs and system damage.
Another preventive measure is keeping the seal moisturized when your RV is in storage for extended periods. Dry rot is a common cause of seal failure, particularly in vehicles stored through winter months. Applying a thin layer of petroleum jelly or dedicated rubber conditioner to the seal before storing your RV helps maintain flexibility and prevents cracking from dryness. Similarly, if you’re traveling through extremely dry climates, occasional conditioning of the seal prevents the rubber from becoming brittle and prone to tearing. Consider using RV storage covers to protect your entire vehicle during extended downtime.
Choosing the Right Replacement Seal for Your System
Not all RV toilet seals are created equal, and selecting the correct replacement is crucial for proper function. The Thetford Porta Potti line, for example, uses different seal sizes depending on the model and year of manufacture. Before purchasing replacements, locate your toilet’s model number—usually found on a sticker underneath the unit or in the owner’s manual—and cross-reference it with seal compatibility charts. While many seals appear similar, even slight differences in diameter or thickness can prevent proper seating and cause leaks.

When shopping for replacement seals, consider buying quality OEM (Original Equipment Manufacturer) parts rather than universal alternatives. OEM seals are manufactured to exact specifications for your toilet model, using materials tested for durability with that specific design. While aftermarket seals may be less expensive, the savings are often negated by shorter lifespan and potential compatibility issues. Many experienced RV owners keep a spare seal on hand, discovering that buying in multipacks offers significant savings while ensuring you’re prepared for future maintenance needs.
Upgrading Your RV Bathroom for Better Travel Experiences
Maintaining your toilet seal is part of a larger picture of creating a comfortable and functional RV bathroom setup. Beyond basic repairs, consider upgrades that enhance your travel experience. Modern portable toilet models offer improved features like battery-powered electric flushes, larger capacity tanks, and more efficient water use. If you’re doing a complete campervan conversion or upgrading an older RV, evaluating your bathroom layout can prevent maintenance headaches down the road. You might also consider RV bathroom ventilation fans to improve airflow and reduce moisture buildup.
Thoughtful design elements like easy access to toilet components for cleaning and maintenance, proper ventilation to reduce moisture buildup, and convenient water access for flush mechanisms all contribute to a more pleasant bathroom experience. When planning your layout, consider how often you’ll use the toilet in various travel scenarios—are you mostly camping at developed sites with full hookups, or do you prefer boondocking in remote locations where conservation and self-sufficiency are priorities? Your travel style should inform your bathroom setup choices, balancing convenience, maintenance requirements, and resource management.
Integrating Toilet Maintenance with Your Overall RV Water System
Your RV toilet doesn’t function in isolation—it’s part of a larger water and waste system that includes fresh water tanks, pumps, gray water drainage, and waste holding tanks. A well-maintained toilet seal prevents leaks that could overwhelm your holding tank capacity or create unpleasant odors throughout your RV’s plumbing system. When performing seal maintenance, it’s an ideal time to inspect related components like the flush water supply hose, vent pipe connections, and holding tank level sensors for wear or damage.
Understanding how your toilet integrates with your complete water system helps you troubleshoot problems more effectively. For example, if you notice your flush water pressure dropping, the issue might be elsewhere in the system rather than the toilet mechanism itself. Similarly, odors around the toilet area can indicate venting problems in your black water tank rather than a failing seal. Taking a holistic approach to your RV’s plumbing ensures you address root causes rather than just symptoms, creating a more reliable and pleasant overall system.
Confident Travel Through Self-Reliance
Learning to maintain your RV toilet seal represents something bigger than just fixing a leaking bathroom—it’s about developing the self-reliance that defines the RV and van life experience. When you can handle basic repairs yourself, you’re no longer tethered to service centers or dependent on others for your comfort and safety. This independence opens up possibilities for more remote travel, longer trips, and genuine adventures away from developed facilities. Plus, the money saved on professional repairs can be redirected toward experiences that create lasting memories.
Building Your RV Maintenance Toolkit
As you become more comfortable with toilet seal replacement, you’ll naturally expand your DIY RV maintenance skills to other systems. Building a comprehensive toolkit with essential tools like screwdrivers, pliers, wrenches, and specialty RV repair items empowers you to handle a wide range of issues that arise on the road. Many experienced RV travelers create a dedicated maintenance binder with repair manuals, parts lists, and maintenance schedules for all their RV systems—creating a personal reference library that proves invaluable during emergencies. Invest in quality multitools for RV repairs that combine multiple functions in one compact tool.
Consider joining RV forums or online communities where members share repair tips, parts sources, and troubleshooting advice specific to your make and model. The collective knowledge of experienced travelers can help you identify common problems before they become serious, recommend preventive maintenance tasks, and provide confidence that you’re not alone in tackling repairs. Whether you’re planning extended travel adventures or weekend getaways, the combination of hands-on skills, proper tools, and community knowledge creates a foundation for worry-free travels. For those interested in historical exploration during their RV journeys, planning ahead for major events ensures you don’t miss memorable experiences.
Embracing the Full-Time Travel Lifestyle with Confidence
For those dreaming of extended travel or full-time RV living, maintenance skills like toilet seal replacement represent the practical foundation that makes such lifestyles sustainable. The freedom to roam without being tethered to service centers or dependent on others for repairs opens up authentic exploration possibilities. Whether you’re boondocking in national forests, parked at beautiful campsites, or traveling cross-country on extended adventures, knowing you can handle basic maintenance provides peace of mind that enhances every journey.
The confidence gained from DIY repairs extends beyond just mechanical components—it creates a mindset of self-sufficiency that permeates all aspects of travel. When you know you can handle whatever challenges arise on the road, you’re more likely to venture off the beaten path, stay longer in remote locations, and fully embrace the spontaneous adventures that make RV life so rewarding. Each maintenance task you master becomes another building block in your foundation of travel confidence, enabling richer experiences and deeper connections with the places you explore.

By mastering simple maintenance tasks like replacing your RV toilet seal, you’re not just keeping your bathroom functional—you’re cultivating the self-reliance and resourcefulness that transform road trips into true adventures. Every repair you successfully complete builds confidence for the next challenge, creating a positive cycle of increasing capability and exploration potential. The most memorable travel experiences often come from the freedom to venture beyond conventional boundaries, and that freedom begins with the practical skills that keep your home on wheels rolling smoothly down whatever road you choose to follow.