Driving a campervan changes everything about how you experience the road. The views are better from up high, the adventures feel closer, and the freedom is real. But there’s a catch that every van lifer discovers within the first week: you essentially cannot see what’s directly behind you. The rearview mirror that worked fine in your sedan now reflects nothing but the interior of your build — a wall of cabinets, a bed platform, or a curtain. Standard side mirrors help, but they leave dangerous gaps, especially when reversing into tight campsites or navigating busy parking lots.
The solution that thousands of van converters have landed on is surprisingly elegant: a rearview mirror dashcam that replaces your factory mirror with a bright digital display connected to a camera mounted on the back of your van. It is, honestly, one of those upgrades that makes you wonder how you ever drove without it.
The Visibility Problem Nobody Warns You About
When you convert a cargo van into a camper, you’re essentially building a small apartment inside a metal box. The factory rearview mirror becomes useless the moment you install a wall behind the front seats. Most van builders accept this as a trade-off and rely exclusively on side mirrors, but that creates significant blind spots — particularly the area directly behind the vehicle and the low zone beneath the rear windows.
This matters more than you might think. Backup collisions are among the most common insurance claims for RV and van owners, and the costs add up fast. A single incident — backing into a boulder at a dispersed camping site, clipping a parked car in a national park lot, or missing a pedestrian in a campground — can ruin a trip and saddle you with repair bills that dwarf the cost of any camera system.
Beyond the financial hit, there’s the confidence factor. Driving a high-roof, long-wheelbase van is stressful enough without the nagging feeling that you’re guessing every time you put it in reverse. A good 12-inch mirror dashcam system eliminates that anxiety entirely, giving you a crystal-clear view of everything happening behind your vehicle in real time.
What Exactly Is a Mirror Dashcam?
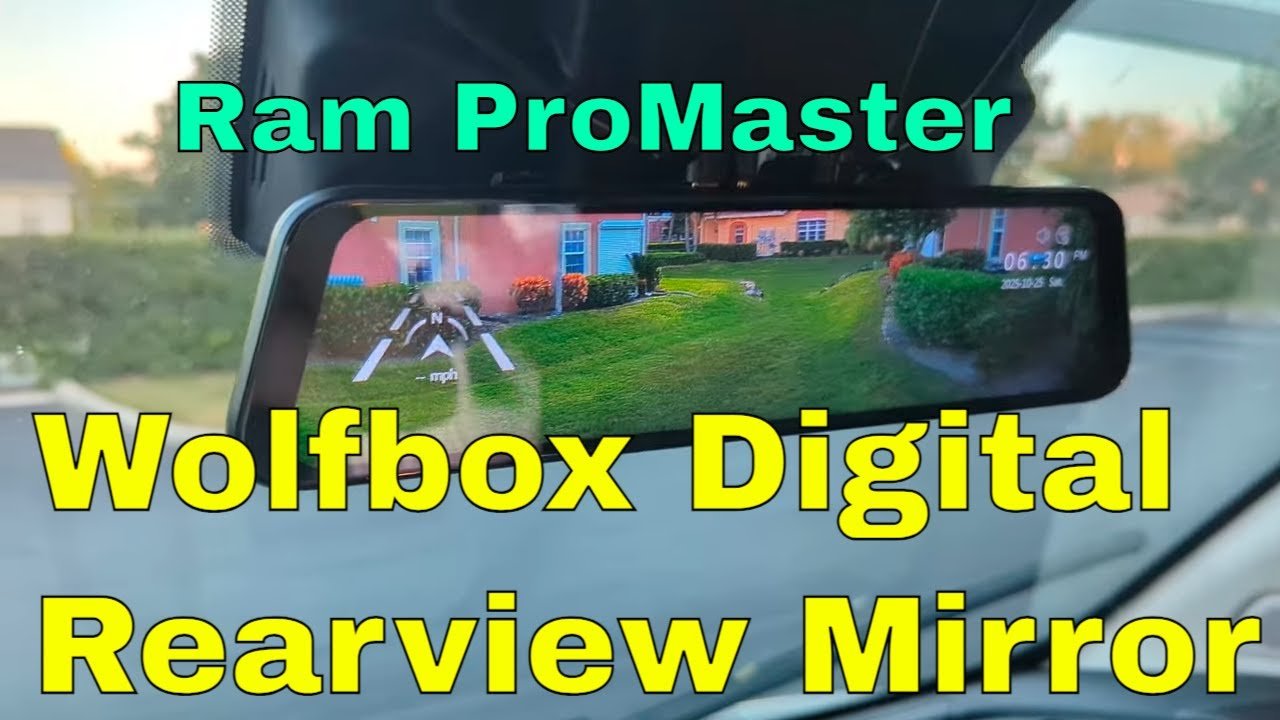
If you’re picturing a clunky piece of tech bolted to your windshield, forget that image. Modern mirror dashcams are designed to strap directly over your existing rearview mirror, blending in so seamlessly that passengers often don’t realize it’s not factory equipment. The device functions as both a reflective mirror (when the screen is off) and a high-resolution digital display (when active), showing a live feed from a rear-facing camera.
The WOLFBOX G840S represents the current sweet spot of this technology. It features a 12-inch display running at 4K resolution for the front camera and 1080p for the rear, with built-in GPS tracking, Wi-Fi connectivity for downloading footage to your phone, and a 32GB storage card included. The rear camera mounts at the top of your back doors using heavy-duty VHB tape — no drilling required — and the cable routes through the vehicle’s headliner for a clean, professional look.
What sets these systems apart from a standard travel dashcam is the real-time display. You’re not just recording footage for after an incident — you’re actively using the camera feed to drive and park safely every single day. It’s the difference between a black box that tells you what happened and a window that shows you what’s happening.
Why Van Conversions Make This Essential
Standard cars have rear windows. Most camper van conversions do not, or if they do, those windows are quickly covered by shelves, storage bins, or window insulation covers. The layout decisions that make your van livable are the same ones that make it harder to see out of.
This is compounded by the size of modern camper vans. A Ram ProMaster 2500 with a high roof is nearly seven feet tall and over 17 feet long. The driver sits high with good forward visibility, but the rear three feet of the vehicle exists in a complete visual dead zone. Adding stick-on blind spot mirrors to your side mirrors helps with adjacent lanes, but they can’t show you what’s directly behind you when reversing.

For anyone who has tried to back into a campsite at dusk, parallel park a van on a narrow European street, or navigate a crowded trailhead parking lot, the value of a live rear camera feed becomes immediately obvious. It transforms a white-knuckle guessing game into a calm, controlled maneuver.
Installation: Harder Than a Sedan, Easier Than You Fear
The thought of running a cable from the back of your campervan all the way to the front sounds intimidating, and honestly, it is the most time-consuming part of the process. But it’s not technically difficult — it just requires patience and the right approach for your specific van.
The rear camera typically mounts at the top edge of one of the rear doors, centered as closely as possible to the vehicle’s midpoint. High-quality VHB automotive tape holds the camera securely without requiring any new holes in the body — an important consideration for anyone worried about leaks in a vehicle that will see rain, snow, and highway-speed wind.
From there, the cable routes up behind the headliner and runs along the roof channel to the front of the van. In a ProMaster, this means removing a series of push-clip fasteners that hold the headliner in place, feeding the cable through the cavity, and reinstalling the clips. Needle-nose pliers make quick work of the clip removal, and the whole process takes maybe 30 minutes if you’re methodical.
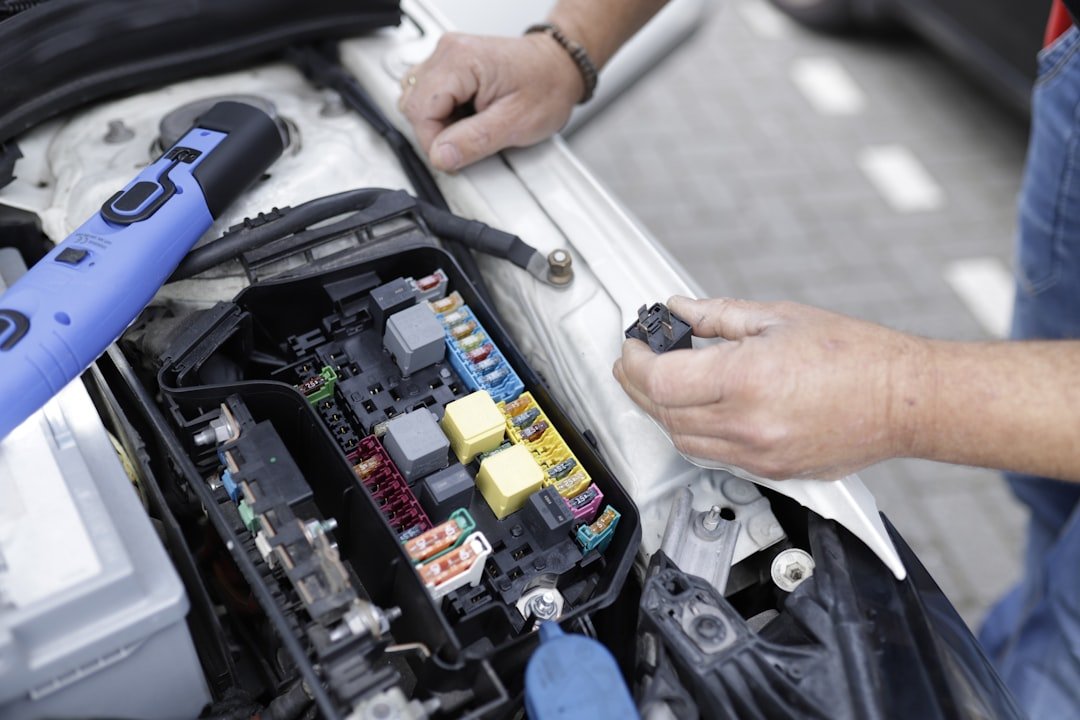
The cable then routes down the passenger-side A-pillar and across to the driver’s side where the fuse box lives on most vans. This is where the project shifts from mechanical to electrical — and where a lot of van builders get nervous. But connecting to the fuse box is straightforward when you use fuse tap adapters that plug into existing fuse slots without cutting or splicing any factory wiring.
The Hardwire Advantage: Always On, Always Recording
Plugging a dashcam into your cigarette lighter works, but it means the camera turns off when you remove the key. For a campervan that might sit in a parking lot or at a campsite for days at a time, that’s a significant limitation. A hardwire kit with low-voltage protection connects directly to your fuse box, giving the camera constant power even when the van is parked.
This enables parking mode — a feature that monitors for motion or impacts while you’re away from the vehicle. If someone backs into your van at a trailhead or a tree branch falls on the roof at a campsite, the camera captures it automatically. For insurance purposes, this footage can be the difference between a successful claim and a costly denial.
The key feature to look for in a hardwire kit is low-voltage protection. This ensures the camera stops drawing power if your starter battery drops below a safe threshold, preventing you from returning to a dead battery after a long trip. Quality kits offer adjustable cutoff voltages, so you can fine-tune the balance between recording time and battery health.
Finding the right fuse slots takes some investigation. On a ProMaster, the 7.5-amp accessory fuse provides switched power (turns on and off with the key), while a 20-amp slot can provide constant power for parking mode. A multimeter is invaluable here — it takes 30 seconds to verify which slots are live and which are dormant. Online resources like fuse box diagrams specific to your vehicle make and year are worth bookmarking before you start.
Backup Camera Integration
One of the most practical features of a mirror dashcam system is its ability to function as a dedicated backup camera. By connecting a wire to your vehicle’s reverse light circuit, the mirror automatically switches to a full-screen rear view with parking guidelines the moment you shift into reverse.
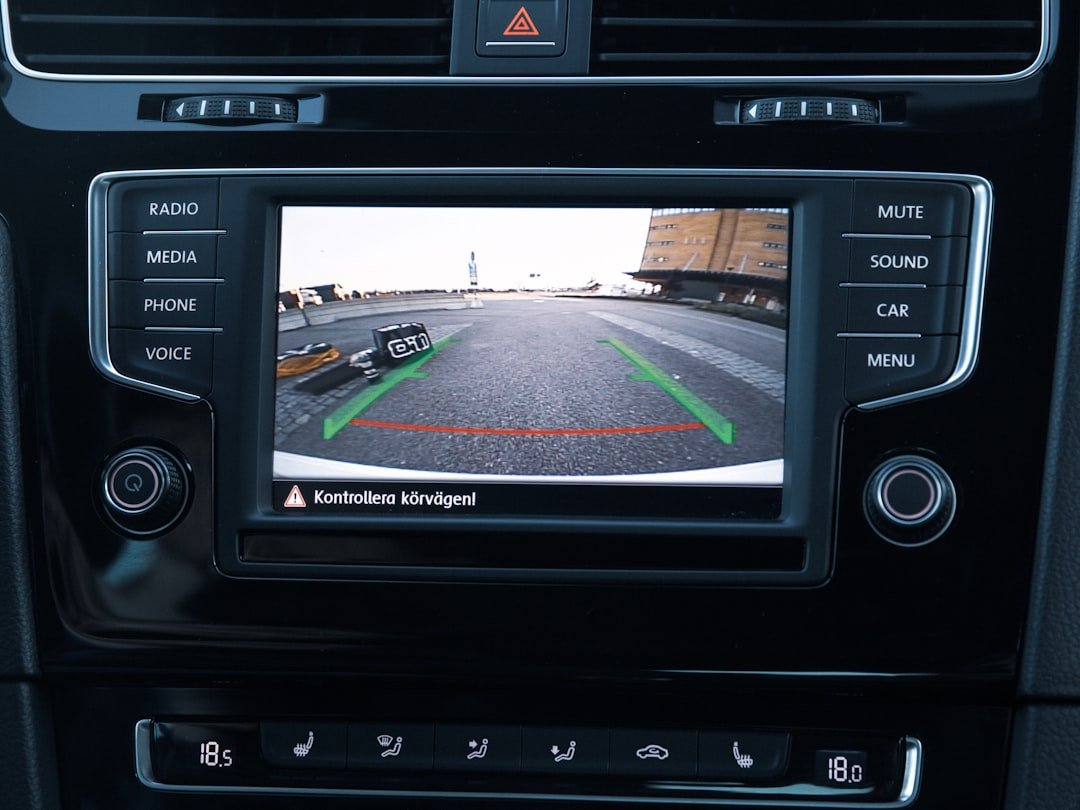
This integration requires identifying the correct wire behind the dashboard — the one that carries voltage only when the vehicle is in reverse. A multimeter makes this straightforward: put the van in reverse, probe wires behind the panel near the cigarette lighter, and look for the one that shows 12 volts. Splice the camera’s trigger wire into this circuit, and the system handles the rest automatically.
The parking guidelines displayed on screen are adjustable, so you can calibrate them to match your specific mounting height and distance. After a day or two of use, you’ll develop an intuitive sense of where those lines correspond to real-world distances, making tight parking maneuvers almost effortless.
Storage, Footage, and Peace of Mind
The practical value of recording your drives extends well beyond accident documentation. Van lifers capture incredible footage of scenic drives, unexpected wildlife encounters, and the kind of road conditions that you’ll want to remember — or warn others about. Loop recording means the camera continuously overwrites old footage, so you never need to manually manage storage. But when something noteworthy happens, the Wi-Fi connection lets you pull footage directly to your phone before it gets overwritten.
A 128GB microSD card provides roughly 10-12 hours of continuous recording at 4K resolution — more than enough for a full day of driving. For extended trips, carrying a spare card lets you swap and save a full day’s worth of footage without needing a laptop.
The GPS module built into quality systems adds another layer of useful data: your exact speed and location at any moment in the recording. This metadata can be invaluable in a disputed incident, and it creates an impromptu travel log of everywhere you’ve been.
Choosing the Right System
The mirror dashcam market has expanded significantly, and the options can feel overwhelming. For campervan use specifically, prioritize these features:
- Screen size: 12 inches is ideal for vans — large enough to see clearly while driving, not so large that it obstructs your forward view. The G840S hits this mark perfectly.
- 4K front resolution: Essential for reading license plates and capturing detail at distance. Don’t settle for 1080p on the front camera.
- Wi-Fi connectivity: Makes downloading footage to your phone trivial. Look for 5.8GHz Wi-Fi, which is faster and more reliable than older 2.4GHz systems.
- Night vision: Critical for early morning departures and late-night arrivals at campsites. Look for systems with WDR (Wide Dynamic Range) for balanced exposure in mixed lighting.
- Parking mode: Requires a hardwire connection but provides 24/7 monitoring. Verify the system supports buffered recording (captures a few seconds before the trigger event).
- GPS logging: Records speed and location data alongside video footage. Useful for insurance disputes and creating travel logs.
If you want the latest features, the WOLFBOX G850 PRO adds voice control and Advanced Driver Assistance Systems (ADAS), including forward collision warnings and blind spot detection through the camera. For a more budget-friendly option, the G930 offers a slightly smaller 10-inch screen with the same core recording capabilities.
An OEM rubber band mounting bracket is also available as an alternative to the standard strap mount, providing a more permanent and vibration-free attachment — particularly useful on rougher roads where the strap mount might allow slight movement.
The Safety Equation
When you’re living and traveling in a vehicle that doubles as your home, safety takes on a different dimension. It’s not just about avoiding accidents — it’s about situational awareness. A mirror dashcam with parking mode functions as a security camera for your home on wheels. If someone approaches your van at a rest stop or tries to break in at a trailhead, the camera captures the event with timestamped, GPS-tagged footage.

For solo travelers, this peace of mind is difficult to overstate. Knowing that your vehicle is actively monitored — even when you’re hiking, sleeping, or grabbed dinner in town — adds a layer of security that complements your other van build investments. The camera doesn’t sleep, doesn’t get distracted, and doesn’t forget what it saw.
Worth Every Penny
A complete mirror dashcam setup — camera, hardwire kit, memory card, and fuse taps — runs roughly $250-350 depending on the model you choose. That’s less than the deductible on most insurance policies, and a fraction of the cost of a single backing incident. More importantly, it’s an investment in confidence: the ability to drive, park, and explore without the constant low-grade anxiety of not knowing what’s behind you.
For anyone in the middle of a van build or planning one, this should be near the top of your installation list — right alongside insulation and electrical. The difference in daily driving experience is that significant. And once you’ve navigated a narrow mountain road, reversed into a tight festival campsite, and captured stunning footage of a desert sunrise drive — all with the help of that bright screen sitting where your useless mirror used to be — you’ll understand exactly why this upgrade has become a van life essential.