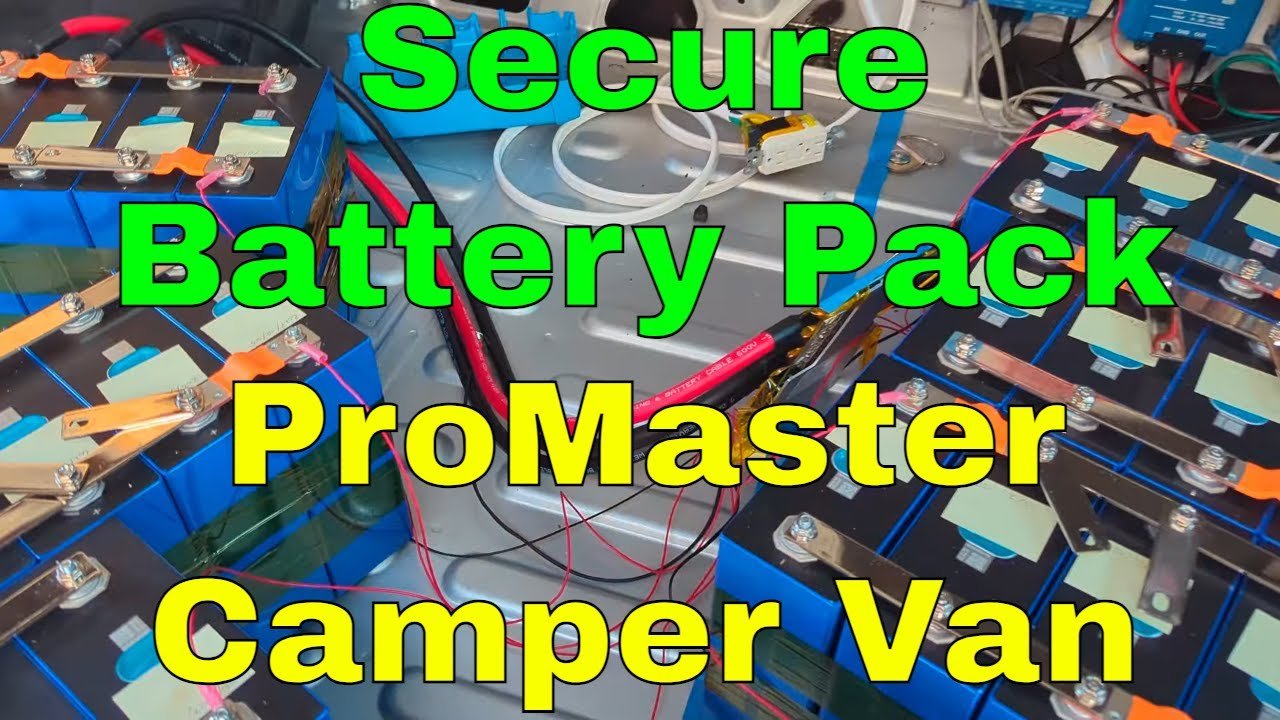
When you’re building out a campervan for long-term travel, the battery system is arguably the most critical component you’ll install. It powers everything from your refrigerator and lights to your laptop and coffee maker. But having a massive battery bank is useless if it’s not properly secured. A loose battery isn’t just an inconvenience — it’s a genuine safety hazard that can damage your van, destroy expensive equipment, and even start a fire. Securing your campervan battery system correctly ensures you can confidently chase remote campsites and boondock for days without worrying about what’s happening to your electrical system on bumpy dirt roads.
Why Battery Security Matters More Than You Think
Most van builders spend hours researching battery capacity, chemistry, and charging systems but barely consider how those batteries will stay put once installed. This oversight becomes painfully obvious the first time you hit a washboard gravel road in Utah or navigate a pothole-filled track in the Oregon backcountry. A 200-pound battery bank shifting even a few inches can shear wiring connections, crack battery casings, or crush nearby components. Beyond the mechanical damage, loose terminals rubbing against metal framing create a real fire risk that could total your entire van build.
The stakes are even higher with modern lithium battery builds. Unlike lead-acid batteries that might leak acid when damaged, lithium cells can experience thermal runaway — a cascading chemical reaction that produces intense heat and toxic gases. Proper mounting isn’t optional with these systems; it’s essential infrastructure that protects your investment and your safety on the road.
Choosing the Right Mounting Framework
Aluminum extrusion framing, particularly the 80/20 t-slot system, has become the gold standard for securing heavy components in campervan builds. These modular aluminum rails provide incredible strength-to-weight ratio, allow precise positioning of cross braces and brackets, and create a rigid structure that bolts directly to the van’s metal floor. The t-slot design means you can adjust, add, or reposition mounting points without drilling new holes or welding — a major advantage when you’re still fine-tuning your layout.
The key to a successful framing approach is planning around your van’s existing structure. Every van has reinforced floor channels, structural ribs, and designated strong points. Using rivnuts installed directly into these structural members gives you mounting points that can handle hundreds of pounds of force without pulling out. Countersinking the mounting hardware flush with the frame surface ensures everything sits flat and level, which prevents stress concentrations that could lead to fatigue failures over thousands of miles of travel.
Rivnut Installation for Rock-Solid Floor Mounts
Rivnuts — also called threaded inserts or nutserts — are the unsung heroes of campervan construction. These clever fasteners create permanent threaded holes in sheet metal without requiring access to the back side. You drill a hole, insert the rivnut, and compress it with a specialized tool that expands the barrel behind the metal, creating a strong, permanent anchor point. For battery mounting, use quality steel or stainless rivnuts rated for the weight you’re securing, typically M6 or M8 size for battery frames.

Installation is straightforward but requires attention to detail. Start with a pilot hole and work up to the correct diameter using a step bit, which cuts clean, precise holes in thin sheet metal. Insert the rivnut onto your installation tool, place it in the hole, and compress it smoothly. Avoid over-tightening, which can cause the rivnut to spin in the hole and lose its grip. A properly installed rivnut should resist significant torque and pulling force — test each one with a wrench before trusting it with your battery bank’s weight. You can find quality rivnut installation tools that make this process quick and reliable.
Weight Distribution and Van Handling
Where you place your battery bank affects how your van drives. This is especially important for front-wheel-drive vans like the Ram ProMaster, where weight over the front axle improves traction and stability. This is especially important when you’re designing your campervan floorplan from scratch. Positioning heavy battery systems behind the driver’s seat rather than in the rear garage area can dramatically improve handling in wet conditions, on steep grades, and during emergency maneuvers. The difference is noticeable enough that some van builders specifically relocate their electrical systems forward even when it complicates their floorplan.

The ideal placement balances several competing factors: proximity to charging sources like solar charge controllers and alternator chargers, accessibility for maintenance, ventilation requirements, and the weight distribution we just discussed. For most builds, the area immediately behind the driver or passenger seat offers the best compromise — it’s forward enough to help with weight distribution, close to the cab for short cable runs, and usually has access to the van’s structural floor for solid mounting. Consider using quality battery cable lugs for secure electrical connections throughout your system.
Protecting Batteries from Temperature Extremes
Battery performance and lifespan are directly affected by temperature. Most lithium iron phosphate cells perform well between 32°F and 113°F, but charging below freezing can cause permanent damage through lithium plating on the anode. If you’re planning to travel through cold climates — and anyone serious about van life eventually will — building cold protection into your battery mounting system is essential. Flexible heating pads installed between battery cells provide targeted warmth when temperatures drop, wired through a thermostat that activates them automatically when needed.

The heating system needs to be integrated into your mounting frame from the start. This means leaving small channels between battery rows for the heating pad wiring, including a temperature sensor mount near the cell surfaces, and planning your electrical connections so the heating circuit can draw power from the battery bank itself when needed. Wiring multiple heating pads in series is a common approach that reduces the voltage each pad receives, making them run at a safer, more controlled temperature. Reliable flexible heating pads designed for battery applications are widely available and worth every penny for cold-weather travelers.
Building a Walkable Surface Above Your Batteries
In a campervan, every square inch of floor space is precious real estate. A well-designed battery mounting system doesn’t just secure the batteries — it creates a structural platform that serves double duty. By building a rigid frame with a solid top cover, you gain usable floor space above the battery compartment while maintaining access for maintenance below. This approach works particularly well with the raised-floor designs common in ProMaster and Transit builds, where the battery area transitions into a step or seating surface.
The cover needs to be removable for battery inspection and terminal access, but secure enough to support foot traffic and the occasional dropped item. Marine-grade plywood or aluminum plate both work well as cover material. Include ventilation openings or a louvered section if your batteries require airflow, and seal any gaps that could let dust or moisture reach the terminals. Using marine-grade plywood ensures the cover will hold up to humidity changes without warping.
Electrical Safety and Connection Best Practices
Securing the physical battery is only half the equation — your electrical connections need equal attention. Every cable in your battery system should be properly terminated with copper wire lugs that are crimped with a professional tool, then sealed with adhesive-lined heat shrink tubing to prevent corrosion and accidental shorts. The difference between a properly crimped and sealed connection and a sloppy one becomes apparent after a few thousand miles of vibration — loose connections generate heat, increase resistance, and can eventually melt terminal blocks or start fires.

Organize your wiring with proper routing, securing cables away from sharp edges and moving parts. Use cable glands where wires pass through panels, and label both ends of every wire for easier troubleshooting down the road. Include appropriately rated fuses or circuit breakers on every circuit, positioned as close to the battery as possible. A well-organized battery compartment with clear wiring runs, proper fusing, and secure connections is the hallmark of a professional van build — and it’s what keeps you safe when you’re miles from the nearest cell signal. Having reliable internet connectivity on the road adds another layer of confidence when exploring remote areas.
The Freedom of a Properly Built System
There’s a profound peace of mind that comes from knowing your electrical system is bulletproof. When every battery is secured against forces that would shake a loosely mounted system to pieces, when every connection is sealed and fused, when heating pads keep your cells at optimal temperature through freezing nights — that’s when you can truly embrace the boondocking lifestyle without reservation. You can confidently take that rough Forest Service road to the perfect dispersed campsite, knowing your battery bank will arrive in the same condition it left.

The upfront investment in proper mounting hardware, quality fasteners, and careful installation pays dividends every single day you spend on the road. Whether you’re running a modest 200-amp-hour system for weekend trips or a massive 37-kilowatt-hour bank designed for indefinite off-grid living, the principles remain the same: secure mounting, proper electrical connections, thoughtful weight distribution, and temperature management. Build it right once, and your battery system will serve you faithfully through thousands of miles of adventure. Stock up on essential van life electrical supplies before your next build phase, and don’t forget heat shrink tubing for professional-grade wire sealing, a good crimping tool for reliable connections, and aluminum extrusion framing for your battery mount.